Now you've done it. After that little get-off bent the footpeg bracket and demoted the shift lever to bench art, you've finally got the parts to make your bike rideable again. Unfortunately, all that thread-locking compound between the aluminum frame threads and that steel bolt have made the fastener harder to extract than a Wisconsinite from the new cheese bar at Sizzler. Worse, you got a little excited and stripped the threads.
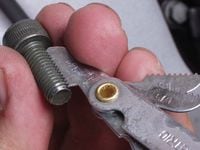
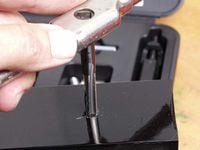
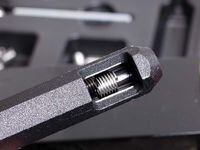
If the damage isn't severe, and only the first few threads are crossed (1), the repair will be fairly easy. Reach for your handy-dandy tap-and-die kit and confirm the size and thread pitch of the fastener. Most tap kits come with a thread gauge (2); use this to verify which tap you'll be using. This is an 8mm thread with a 1.25mm thread pitch--meaning the fastener penetrates 1.25mm for every turn.
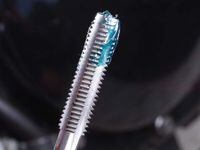
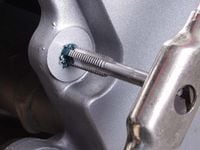
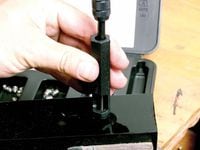
Decontaminate the botched threads with contact cleaner, then put a dab of grease on the tap (3). Insert the tap and carefully (very carefully!) begin threading it into the hole (4). When you feel resistance, stop and back it out. Work the tap gently into the damaged threads, following the existing threads as much as possible. (You don't want to cut your own new threads.) Turn the tap a half turn and then back it out a quarter turn to clean metal chips from the threads. Continue until the tap turns freely in the threads and then remove it. The repair will look something like this (5).
If you can't make the threads clean and straight enough to be safe, then you need a repair kit like the HeliCoil system. Installation is amazingly straightforward, if you follow the directions.
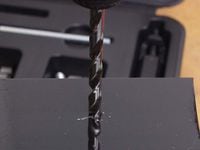
Use the supplied drill bit to enlarge and clean up the hole you're attempting to rethread (6). Take the supplied tap and cut new threads into the enlarged hole, again taking your time and using grease on the tap to catch the metal chips (7). Place the insert in the supplied tool with the threading mandrel pulled back and the stop pin facing the tapered end of the tool (8). Turn the mandrel until the insert is just at the end of the tool, and then place it against the hole you've just drilled and tapped. Continue turning the mandrel until the HeliCoil is inside the threaded hole (9) and flush with the surface. Retract the mandrel and use the supplied pin to knock the installation tang from the insert. Retrieve the pin and you're set. You'll be more careful with those threads next time.


/cloudfront-us-east-1.images.arcpublishing.com/octane/QFWSHFIAVJFYHJP2EW2WCBSQKM.jpg)
/cloudfront-us-east-1.images.arcpublishing.com/octane/E7JIQW5QUFEETJSINPACVVMNJA.jpg)
/cloudfront-us-east-1.images.arcpublishing.com/octane/ZQKXOH5IJZCGFH2R4CODE2O5DU.jpg)
/cloudfront-us-east-1.images.arcpublishing.com/octane/PGISTEH3IRAQXFQSN4JUS5HXAE.jpg)
/cloudfront-us-east-1.images.arcpublishing.com/octane/MRE3NOHY5FGX7F65XPQSIK2PTQ.jpg)
/cloudfront-us-east-1.images.arcpublishing.com/octane/4DYAKEGB2NGHDCY5NAH4P6WBOE.jpg)
/cloudfront-us-east-1.images.arcpublishing.com/octane/ES36QYKRE5BBTDISYP2ET2WNBI.jpg)
/cloudfront-us-east-1.images.arcpublishing.com/octane/UJQXWCK2W5DF5ISVW6AVKQHD5E.jpg)
/cloudfront-us-east-1.images.arcpublishing.com/octane/LWBFMM4GFRF6DMYOIFCUZKR5NA.jpg)
/cloudfront-us-east-1.images.arcpublishing.com/octane/6DLRAI6Y7RGM5BJ4XQ5S4I7B5Q.jpg)
/cloudfront-us-east-1.images.arcpublishing.com/octane/FP3BEUWUV5AXNP4XD5B2NQ2T3I.jpg)
/cloudfront-us-east-1.images.arcpublishing.com/octane/VH3KHVEPTZBW3PMW4FILG7KTRI.jpg)
/cloudfront-us-east-1.images.arcpublishing.com/octane/E3EZTFJ4SNEXREY2EOYILUINXM.jpg)
/cloudfront-us-east-1.images.arcpublishing.com/octane/ENMROQOVOVH7ZLHC7WFWJX52EM.jpg)
/cloudfront-us-east-1.images.arcpublishing.com/octane/PAC5FEGNSBBB5JLXQ6GWEBB2KI.jpg)
/cloudfront-us-east-1.images.arcpublishing.com/octane/DKBQ5TKZKFB5RGK45T344N6ZYI.jpg)
/cloudfront-us-east-1.images.arcpublishing.com/octane/ZM6HFGPAQVDAHFMPXXKVCUMU2U.jpg)
/cloudfront-us-east-1.images.arcpublishing.com/octane/MHXGBY55VFAGXNO4VTQYQF7SIU.jpg)
/cloudfront-us-east-1.images.arcpublishing.com/octane/T4SIVQJODRBGHCGMKHWAF5QYPM.jpg)
/cloudfront-us-east-1.images.arcpublishing.com/octane/3GLDHNCLSREALL4QAK5U76JILI.jpg)
/cloudfront-us-east-1.images.arcpublishing.com/octane/OFSXJJ5PZFEZ5D5ZPMCFVHJUMA.jpg)
/cloudfront-us-east-1.images.arcpublishing.com/octane/N2JLNLG44VEKBMEPORRDTMX5A4.jpg)
/cloudfront-us-east-1.images.arcpublishing.com/octane/PYWEGG6FHJD6XLPKICS7XHMMZ4.jpg)
/cloudfront-us-east-1.images.arcpublishing.com/octane/XXFQQQ4AYJDCXDGVW3JTHAYONI.jpg)