Your bike's plugs do their job without a whimper, so you stop thinking about how long they've been in there. You're not alone: One of our own has a 10,000-mile-old SV650 whose plugs have never been inspected, much less changed. (Bad boy!)
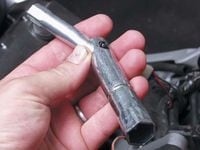
Plug replacement is straightforward once access issues are out of the way. With most modern inline engines, you'll certainly have to remove the tank and probably lift the airbox out of the way. For tools, you'll need whatever it takes to get the tank (and seat, if necessary) off the bike, plus a specialized plug socket. Amazingly, the item in the factory tool kit usually works fine (1). Find a small quantity of antiseize compound or bona-fide spark-plug lube (2). (Try Champion part number 2612; $5.95 for a four-ounce bottle that will last a lifetime. It's available at better auto parts stores, or from Aircraft Spruce and Specialty, 877/477-7823, www.aircraft-spruce.com .)
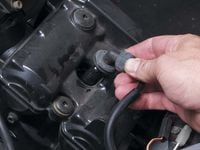
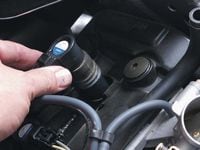
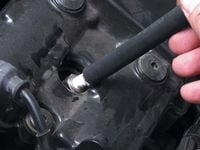
Your next task is to remove the spark-plug lead, but first you should clean the area with a towel or compressed air. These days, the spark plug lives in a deep well just asking to collect junk. Carefully twist the lead until it breaks free from the plug (3), and pull it straight up and out. Take a moment to inspect the plug cap for cracks and abrasions. For bikes with coil-on-plug ignition (pardon us as we skip to a GSX-R600), carefully remove the electrical connector to the coil and gently lift the coil up as you twist (4). Some models may have the coil screwed to the cam cover, and if so, remove this fastener first.
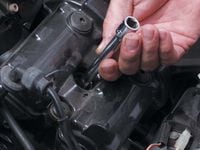
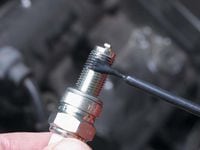
Shine a flashlight into the spark-plug cavity to look for road debris and the like; if you see any, blow it out now. Slide the socket into the recess and be sure it is securely on the spark-plug hex by gently rotating it (5). Loosen the spark plug. Note: It should not be terribly easy or hard to remove, and should absolutely not be loose already. Lift the plug out and examine it (6). You say it fell out of the socket? Try inserting a length of fuel line into the well, where it will slip over the ceramic insulator; lift it free (7).
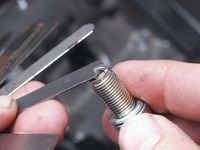
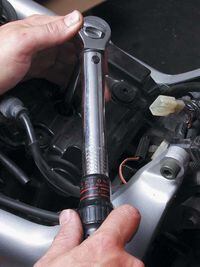
Installation is straightforward, but take your time. Check the electrode gap (8)--this Suzuki's should be 0.7mm-0.9mm. Apply antiseize to the threads just below the tip (9); do not apply it to the first thread or get any on the insulator or electrode. Slip the plug back down into the well and begin threading only by hand. Aluminum heads have fragile threads--and the spark plug is steel--so what's going to give is the expensive part if you cross-thread it. Cinch it down by hand and torque to spec (10). Even if you use your torque wrench rarely, this is the time. Follow the service manual recommendations, but in its absence, torque spark plugs with 8mm threads to 6-7 foot-pounds; 10mm threads to 7-9 foot-pounds; 12mm threads to 11-14 foot-pounds. Take your time putting it all back together and be certain that you have the plug wires going to the appropriate plugs and that they seat fully. Listen for the click, click, click as the clip locks to the threaded tip. For individual-coil models, it doesn't matter which coils go where--they're identical--and, usually, the wiring harness is built so that it'll only fit one way. Easy stuff, then.


/cloudfront-us-east-1.images.arcpublishing.com/octane/QFWSHFIAVJFYHJP2EW2WCBSQKM.jpg)
/cloudfront-us-east-1.images.arcpublishing.com/octane/E7JIQW5QUFEETJSINPACVVMNJA.jpg)
/cloudfront-us-east-1.images.arcpublishing.com/octane/ZQKXOH5IJZCGFH2R4CODE2O5DU.jpg)
/cloudfront-us-east-1.images.arcpublishing.com/octane/PGISTEH3IRAQXFQSN4JUS5HXAE.jpg)
/cloudfront-us-east-1.images.arcpublishing.com/octane/MRE3NOHY5FGX7F65XPQSIK2PTQ.jpg)
/cloudfront-us-east-1.images.arcpublishing.com/octane/4DYAKEGB2NGHDCY5NAH4P6WBOE.jpg)
/cloudfront-us-east-1.images.arcpublishing.com/octane/ES36QYKRE5BBTDISYP2ET2WNBI.jpg)
/cloudfront-us-east-1.images.arcpublishing.com/octane/UJQXWCK2W5DF5ISVW6AVKQHD5E.jpg)
/cloudfront-us-east-1.images.arcpublishing.com/octane/LWBFMM4GFRF6DMYOIFCUZKR5NA.jpg)
/cloudfront-us-east-1.images.arcpublishing.com/octane/6DLRAI6Y7RGM5BJ4XQ5S4I7B5Q.jpg)
/cloudfront-us-east-1.images.arcpublishing.com/octane/FP3BEUWUV5AXNP4XD5B2NQ2T3I.jpg)
/cloudfront-us-east-1.images.arcpublishing.com/octane/VH3KHVEPTZBW3PMW4FILG7KTRI.jpg)
/cloudfront-us-east-1.images.arcpublishing.com/octane/E3EZTFJ4SNEXREY2EOYILUINXM.jpg)
/cloudfront-us-east-1.images.arcpublishing.com/octane/ENMROQOVOVH7ZLHC7WFWJX52EM.jpg)
/cloudfront-us-east-1.images.arcpublishing.com/octane/PAC5FEGNSBBB5JLXQ6GWEBB2KI.jpg)
/cloudfront-us-east-1.images.arcpublishing.com/octane/DKBQ5TKZKFB5RGK45T344N6ZYI.jpg)
/cloudfront-us-east-1.images.arcpublishing.com/octane/ZM6HFGPAQVDAHFMPXXKVCUMU2U.jpg)
/cloudfront-us-east-1.images.arcpublishing.com/octane/MHXGBY55VFAGXNO4VTQYQF7SIU.jpg)
/cloudfront-us-east-1.images.arcpublishing.com/octane/T4SIVQJODRBGHCGMKHWAF5QYPM.jpg)
/cloudfront-us-east-1.images.arcpublishing.com/octane/3GLDHNCLSREALL4QAK5U76JILI.jpg)
/cloudfront-us-east-1.images.arcpublishing.com/octane/OFSXJJ5PZFEZ5D5ZPMCFVHJUMA.jpg)
/cloudfront-us-east-1.images.arcpublishing.com/octane/N2JLNLG44VEKBMEPORRDTMX5A4.jpg)
/cloudfront-us-east-1.images.arcpublishing.com/octane/PYWEGG6FHJD6XLPKICS7XHMMZ4.jpg)
/cloudfront-us-east-1.images.arcpublishing.com/octane/XXFQQQ4AYJDCXDGVW3JTHAYONI.jpg)