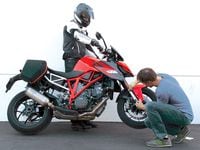
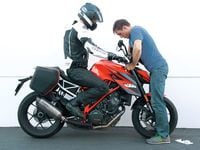
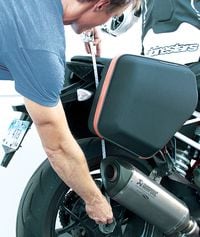
Measuring and adjusting rider sag are the first steps in setting up any bike's suspension. Bringing rider sag into the proper range (typically 30 to 40mm, front and rear) will place your bike's ride height, ground clearance, rake, trail, and other important factors into the right range and also help you to determine if the spring rates already on the bike are right for your weight.
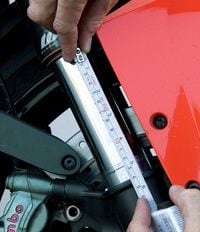
We prefer the “Race Tech” method of checking sag because it takes into account stiction (static friction) within the suspension components. To check rider sag, you’ll need the rider (fully dressed in riding apparel) and a tape measure (preferably a metric one) as well as any tools needed to adjust your bike’s preload. Plus an assistant—checking sag properly is a two-person job.
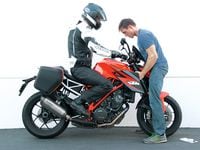
To check free sag, repeat the following procedures with the bike unladen instead of with the rider aboard. Have a look at part one of our "Making Sense Of Suspension" story HERE to understand what free sag means and how to know if your bike's is in the proper range.

/cloudfront-us-east-1.images.arcpublishing.com/octane/QFWSHFIAVJFYHJP2EW2WCBSQKM.jpg)
/cloudfront-us-east-1.images.arcpublishing.com/octane/E7JIQW5QUFEETJSINPACVVMNJA.jpg)
/cloudfront-us-east-1.images.arcpublishing.com/octane/ZQKXOH5IJZCGFH2R4CODE2O5DU.jpg)
/cloudfront-us-east-1.images.arcpublishing.com/octane/PGISTEH3IRAQXFQSN4JUS5HXAE.jpg)
/cloudfront-us-east-1.images.arcpublishing.com/octane/MRE3NOHY5FGX7F65XPQSIK2PTQ.jpg)
/cloudfront-us-east-1.images.arcpublishing.com/octane/4DYAKEGB2NGHDCY5NAH4P6WBOE.jpg)
/cloudfront-us-east-1.images.arcpublishing.com/octane/ES36QYKRE5BBTDISYP2ET2WNBI.jpg)
/cloudfront-us-east-1.images.arcpublishing.com/octane/UJQXWCK2W5DF5ISVW6AVKQHD5E.jpg)
/cloudfront-us-east-1.images.arcpublishing.com/octane/LWBFMM4GFRF6DMYOIFCUZKR5NA.jpg)
/cloudfront-us-east-1.images.arcpublishing.com/octane/6DLRAI6Y7RGM5BJ4XQ5S4I7B5Q.jpg)
/cloudfront-us-east-1.images.arcpublishing.com/octane/FP3BEUWUV5AXNP4XD5B2NQ2T3I.jpg)
/cloudfront-us-east-1.images.arcpublishing.com/octane/VH3KHVEPTZBW3PMW4FILG7KTRI.jpg)
/cloudfront-us-east-1.images.arcpublishing.com/octane/E3EZTFJ4SNEXREY2EOYILUINXM.jpg)
/cloudfront-us-east-1.images.arcpublishing.com/octane/ENMROQOVOVH7ZLHC7WFWJX52EM.jpg)
/cloudfront-us-east-1.images.arcpublishing.com/octane/PAC5FEGNSBBB5JLXQ6GWEBB2KI.jpg)
/cloudfront-us-east-1.images.arcpublishing.com/octane/DKBQ5TKZKFB5RGK45T344N6ZYI.jpg)
/cloudfront-us-east-1.images.arcpublishing.com/octane/ZM6HFGPAQVDAHFMPXXKVCUMU2U.jpg)
/cloudfront-us-east-1.images.arcpublishing.com/octane/MHXGBY55VFAGXNO4VTQYQF7SIU.jpg)
/cloudfront-us-east-1.images.arcpublishing.com/octane/T4SIVQJODRBGHCGMKHWAF5QYPM.jpg)
/cloudfront-us-east-1.images.arcpublishing.com/octane/3GLDHNCLSREALL4QAK5U76JILI.jpg)
/cloudfront-us-east-1.images.arcpublishing.com/octane/OFSXJJ5PZFEZ5D5ZPMCFVHJUMA.jpg)
/cloudfront-us-east-1.images.arcpublishing.com/octane/N2JLNLG44VEKBMEPORRDTMX5A4.jpg)
/cloudfront-us-east-1.images.arcpublishing.com/octane/PYWEGG6FHJD6XLPKICS7XHMMZ4.jpg)
/cloudfront-us-east-1.images.arcpublishing.com/octane/XXFQQQ4AYJDCXDGVW3JTHAYONI.jpg)