There are two basic ways to alter a sportbike's chassis geometry. The first is moving the fork tubes up or down within the triple clamps, which alters front ride height and overall geometry. Bring the fork tubes upward in the clamps and you'll reduce rake and trailquickening steering—as well as overall ride height. Dropping the front may make cornering clearance an issue, and you shouldn't lower it so far that the front wheel contacts the engine, exhaust system or radiator at full compression. (That was the screeching noise you heard just before the crash.)
Racers and many savvy track-goers prefer the second method, raising the rear of the bike. Most sportbikes now come with a removable, U-shaped piece that connects the top of the shock to the motorcycle's frame. (Exception: Honda's new Unit Pro-Link.) This arrangement permits the use of a small shim or washer between the U-shaped shock clevis and the frame, which increases total shock length and raises the back of the bike. (You can accomplish some of this through spring preload, but you may find the suspension topping out before reaching the desired chassis geometry.)
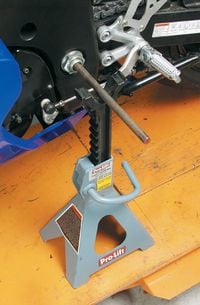
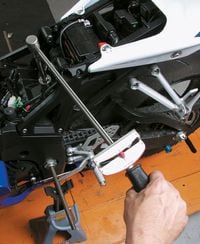
We're using a Suzuki GSX-R600 as an example, but most modern sportbikes are similar. Remove the seat and fuel tank. (You don't have to remove the tank on the Suzuki, but it's much easier if you do.) Support the bike so that all the weight is off the rear suspension. We like this cheap approach (1): shoving a steel rod through the hollow swingarm pivot that's supported by jack stands. Place the bike on a rear-wheel track stand first, then raise the jack stands until they just touch the rod. Keep the paddock stand in place for now.
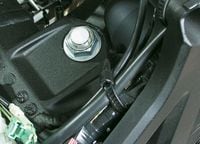
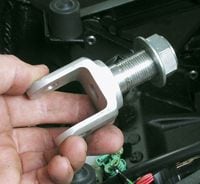
This is the top nut (2), which requires a 27mm wrench. Use a socket instead of a crescent wrench. Just break the torque on this nut; don't remove it yet. To make room for the clevis to drop down, remove the track stand, placing the bike's weight on the jack stands. Support the swingarm with one hand and then extract the upper shock bolt (3). Allow the suspension to drop to the ground. Now remove the large clevis nut and wiggle the piece free. Here's what it looks like out of the frame (4).
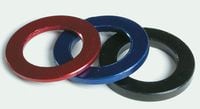
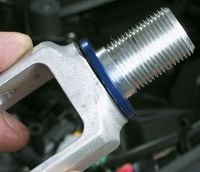
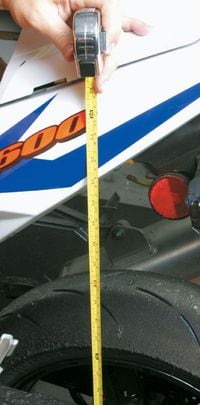
Some bikes may accept hardware-store washers, but the Suzuki's is big. Try these anodized shims (5) from Traxxion Dynamics ($19.95; www.traxxion.com ). They come in three thicknesses: 2mm, 3mm and 4mm. Select the one you want and place it over the threaded part of the clevis (6), making sure it lays flat. The shim must be between the clevis and the frame. Now simply reinstall the clevis and upper-shock bolt. Torque to specs, approximately 50 foot-pounds for the clevis (7) and 37 foot-pounds for the shock bolt. With the rear suspension still hanging free, check the new ride height. Here, a 3mm shim increases ride height by 12mm. Measure the change on your bike and make a note of it (8). Alter the ride height 10-15mm at a time and see how you like it.

/cloudfront-us-east-1.images.arcpublishing.com/octane/QFWSHFIAVJFYHJP2EW2WCBSQKM.jpg)
/cloudfront-us-east-1.images.arcpublishing.com/octane/E7JIQW5QUFEETJSINPACVVMNJA.jpg)
/cloudfront-us-east-1.images.arcpublishing.com/octane/ZQKXOH5IJZCGFH2R4CODE2O5DU.jpg)
/cloudfront-us-east-1.images.arcpublishing.com/octane/PGISTEH3IRAQXFQSN4JUS5HXAE.jpg)
/cloudfront-us-east-1.images.arcpublishing.com/octane/MRE3NOHY5FGX7F65XPQSIK2PTQ.jpg)
/cloudfront-us-east-1.images.arcpublishing.com/octane/4DYAKEGB2NGHDCY5NAH4P6WBOE.jpg)
/cloudfront-us-east-1.images.arcpublishing.com/octane/ES36QYKRE5BBTDISYP2ET2WNBI.jpg)
/cloudfront-us-east-1.images.arcpublishing.com/octane/UJQXWCK2W5DF5ISVW6AVKQHD5E.jpg)
/cloudfront-us-east-1.images.arcpublishing.com/octane/LWBFMM4GFRF6DMYOIFCUZKR5NA.jpg)
/cloudfront-us-east-1.images.arcpublishing.com/octane/6DLRAI6Y7RGM5BJ4XQ5S4I7B5Q.jpg)
/cloudfront-us-east-1.images.arcpublishing.com/octane/FP3BEUWUV5AXNP4XD5B2NQ2T3I.jpg)
/cloudfront-us-east-1.images.arcpublishing.com/octane/VH3KHVEPTZBW3PMW4FILG7KTRI.jpg)
/cloudfront-us-east-1.images.arcpublishing.com/octane/E3EZTFJ4SNEXREY2EOYILUINXM.jpg)
/cloudfront-us-east-1.images.arcpublishing.com/octane/ENMROQOVOVH7ZLHC7WFWJX52EM.jpg)
/cloudfront-us-east-1.images.arcpublishing.com/octane/PAC5FEGNSBBB5JLXQ6GWEBB2KI.jpg)
/cloudfront-us-east-1.images.arcpublishing.com/octane/DKBQ5TKZKFB5RGK45T344N6ZYI.jpg)
/cloudfront-us-east-1.images.arcpublishing.com/octane/ZM6HFGPAQVDAHFMPXXKVCUMU2U.jpg)
/cloudfront-us-east-1.images.arcpublishing.com/octane/MHXGBY55VFAGXNO4VTQYQF7SIU.jpg)
/cloudfront-us-east-1.images.arcpublishing.com/octane/T4SIVQJODRBGHCGMKHWAF5QYPM.jpg)
/cloudfront-us-east-1.images.arcpublishing.com/octane/3GLDHNCLSREALL4QAK5U76JILI.jpg)
/cloudfront-us-east-1.images.arcpublishing.com/octane/OFSXJJ5PZFEZ5D5ZPMCFVHJUMA.jpg)
/cloudfront-us-east-1.images.arcpublishing.com/octane/N2JLNLG44VEKBMEPORRDTMX5A4.jpg)
/cloudfront-us-east-1.images.arcpublishing.com/octane/PYWEGG6FHJD6XLPKICS7XHMMZ4.jpg)
/cloudfront-us-east-1.images.arcpublishing.com/octane/XXFQQQ4AYJDCXDGVW3JTHAYONI.jpg)