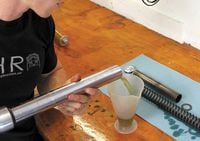
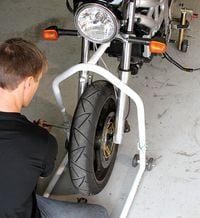
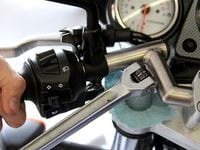
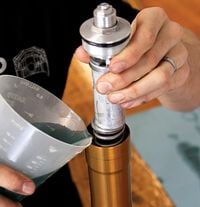
You change your bike’s engine oil regularly, but when was the last time you changed your fork oil? The oil in your fork loses lubricity, gets dirty, and should be changed every 10,000 miles or once a year. Here’s the quickest way to do it—and, yes, we know there’s a better way to do a cartridge fork. Just not a quicker way.


/cloudfront-us-east-1.images.arcpublishing.com/octane/IN263JIBTBCD3O265IMSCW6OZM.jpg)
/cloudfront-us-east-1.images.arcpublishing.com/octane/SMAQ354X2JH7NJATXNSQY4NRS4.jpg)
/cloudfront-us-east-1.images.arcpublishing.com/octane/GGOH2AQRSVHY5C5JLNEVYLB5SU.jpg)
/cloudfront-us-east-1.images.arcpublishing.com/octane/TJJEHV3ATZFFXHUYZABHXKE2DI.jpg)
/cloudfront-us-east-1.images.arcpublishing.com/octane/WIC4RXQ36BAXNIW6U4UJ3XDLKI.jpg)
/cloudfront-us-east-1.images.arcpublishing.com/octane/B4PQZLY4LBHITGE5ZRRM2N5YNU.jpg)
/cloudfront-us-east-1.images.arcpublishing.com/octane/OBYS7KWZUJFCHD44YPTSVM5EF4.jpg)
/cloudfront-us-east-1.images.arcpublishing.com/octane/FY7ZXYBT4NH2NGYQIWQVITS4AM.jpg)
/cloudfront-us-east-1.images.arcpublishing.com/octane/JPET6WQUDZEYLNXVY5LRNDRPLA.jpg)
/cloudfront-us-east-1.images.arcpublishing.com/octane/EY6P2QIFQJCDTNOMR3JB7WJED4.jpg)
/cloudfront-us-east-1.images.arcpublishing.com/octane/V2U6JB7KXNCQRN4OW6HNJTVMZQ.jpg)
/cloudfront-us-east-1.images.arcpublishing.com/octane/AMS43BT5ABH77NY7XKLCSZCNM4.jpg)
/cloudfront-us-east-1.images.arcpublishing.com/octane/NTK2ASYKUBDW5MQDWQLVQYOELY.jpg)
/cloudfront-us-east-1.images.arcpublishing.com/octane/SX7R3KCIANGDBGF45O73F543TM.jpg)
/cloudfront-us-east-1.images.arcpublishing.com/octane/ZTW4V7RAPFG6RFWJRXR2IX5ZQ4.jpg)
/cloudfront-us-east-1.images.arcpublishing.com/octane/EPRSLPIUTBC5RPD7R263BPV2D4.jpg)
/cloudfront-us-east-1.images.arcpublishing.com/octane/EMJ4I2T4HVCRVJPZ3UJFVMRDHA.jpg)
/cloudfront-us-east-1.images.arcpublishing.com/octane/CBDAM3VMJNFDBLE7Y3FY7RD5BY.jpg)
/cloudfront-us-east-1.images.arcpublishing.com/octane/CCEB3TNMU5FH3OZ4FKJ7DA2LBA.jpg)
/cloudfront-us-east-1.images.arcpublishing.com/octane/VV6N3KUWEVFJJD7F7VX6ICOH7Q.jpg)
/cloudfront-us-east-1.images.arcpublishing.com/octane/R55SVEXZ5VA2LCWFWYR647ASX4.jpg)
/cloudfront-us-east-1.images.arcpublishing.com/octane/MYWIEFOQ6JCCNDR4OBF5PU5LVE.jpg)
/cloudfront-us-east-1.images.arcpublishing.com/octane/OOZ3C4GCUJGRNONDI6DHVM57GI.jpg)
/cloudfront-us-east-1.images.arcpublishing.com/octane/JEKB3CMWXZD6ZAVFEDKLOQ5FNY.jpg)